Oct 16 2012

Tweet My Post is Back, Working

Category: Programming,Tweet My Post,WordPressksg91 @ 12:48 pm

Sorry for the inconvenience, guys. Tweet My Post was not working for last 4-5 days and I only got to know about that 2 days back.

Being quite busy in office projects, I didn’t have enough time to look after my plugin. But I have already released the hotfix which has solved the issue. Tweet My Post is working again.  Go and update the plugin from your admin panel or download it from http://wordpress.org/extend/plugins/tweet-my-post/ asap.

My plugin uses https://github.com/jmathai/twitter-async library for Twitter API. It uses version 1, which is deprecated. However version 1 should work till March 2013 but it was returning “Page Not Found” error for last 5 days. I don’t have clue what has gone wrong with Twitter API or this plugin and I don’t have enough time to look into that either.

I fixed the issue by changing the version to 1.1 by updating line number 25 in EpiTwitter.php to

[php] protected $apiVersion = ‘1.1’;[/php]

You can also use library’s function to update version to 1.1 by using

[php]$EpiTwitter->useApiVersion(‘1.1’);[/php]

before sending any request.

I’ve sent the pull request already to Github. Author of library will unit test the changes and merge it asap. You can use updated version by downloading it from https://github.com/ksg91/twitter-async until it is merged.

Tags: , , , , , , , ,


Oct 15 2012

Test Post

Category: Tweet My Postksg91 @ 5:03 pm

Test Post


Jul 19 2012

Transferring Data Securely on HTTP using PHP

Category: PHP,Tips & Tricksksg91 @ 4:23 pm

Image courtesy of MIT OCW.

Well, I have been working on a WordPress plugin and I required to transfer some data from client’s host to my host. Data is Access Token and Secrets for their Twitter account (Of course, not to store it on my host but to perform their operations on Twitter). Being sensitive data, it was required to transfer them securely over the network, keeping it secure from at MITM attacks. As a option, I can use buy a IP and SSL certificate and transfer it using HTTPS. But, being a free plugin, I really didn’t want to spend money in such things. And only option I was left with was to use HTTP and transferring data encrypted.

For this, client will register to me and avail its access token and secret (not of twitter, but for my site). There were multiple data and instead of encrypting them independently, I decided to make a class named Request which holds all the data to be transferred.  Now this request class is serialized and then that string can be encrypted.

I use following code snippet to encrypt :

[php]
$req=serialize($this->request);
$req=$this->key.$req;
$this->enc_req = base64_encode(mcrypt_encrypt(MCRYPT_RIJNDAEL_256, md5($this->acc_sec), $req, MCRYPT_MODE_CBC, md5(md5($this->acc_sec))));
[/php]

Here,

[php]$this->key[/php]

is Access key given to user and

[php]$this->acc_sec[/php]

is Access Secret given to the user.
Let’s check example of this encryption:

Object Request:

object(Request)[1]
  private 'tmp_key' => string  '___' (length=16)
  private 'tw_acc_tok' => string'blah' (length=4)
  private 'tw_acc_sec' => string 'blah 1' (length=6)
  public 'tweet' => string 'Tweet' (length=5)

Serialized Object

string

 'O:7:"Request":4:{s:16:"?Request?tmp_key";s:16:"___";s:19:"?Request?tw_acc_tok";s:4:"blah";s:19:"?Request?tw_acc_sec";s:6:"blah 1";s:5:"tweet";s:5:"Tweet";}' (length=168)

Encrypted Object

string

 'NxFivVICmrRzh/fSlvT3jeWrT8pdvWRKPPc9lpEe1g1MoYgvom2/Sg6kqm0sqQ/PeYIeJXCahQSubW78CbHzBfMcIXsBCmAistVq/XvkZUSe5Hb5OWIr1D3AiGb5943BO9E2reUKr0GJYyIS+Lxrh1mTvSdpbcu9twt7qqhay6dU77icqu8jdvDBs7XrBTTxDFNS57Cl8KYSICInrJ30nwT8CqLHZdsA4poAhZm7TeIV7xp+bUmRAF5WXV6QUlKm' (length=256)

 Now, this encrypted data is sent to me using cURL and Access Key and encrypted text is send along with it.

On my end, I have access token and secret stored in my database, so I will decrypt the request using the access secret that I have stored in my database with the requesting access token. Following code will help me to recover original Request object:

[php]
 
<pre>
$decrypted = rtrim(mcrypt_decrypt(MCRYPT_RIJNDAEL_256, md5($key), base64_decode($encrypted), MCRYPT_MODE_CBC, md5(md5($key))), "\0");
$so=substr($decrypted,strlen($this->key)+1);
$this->request=unserialize($so);

[/php]

I have used Access Key as a salt. Of course, it’s not the only thing I am going to use to achieve higher security. But I believe, this will be enough to give you an idea of how we can achieve a certain level of security. I am not quite sure how secure this method is, but surely enough for my application.

Please feel free to post your views and comments on this. Hoping, this helped. 🙂

Tags: , , , ,


Jun 07 2012

How to use Virtual Box to install Windows 8

Category: Tips & TricksGTX OC @ 10:37 am

How to use Virtual Box to install Windows 8

Microsoft recently released the Windows 8 release preview and I couldn’t resist trying it out . Problem was that I didn’t have an empty partition . So what did I do ? I used Virtual Box(by Oracle) to create a virtual machine and run the release preview inside Windows 7 and today I will show you how to do it .Basically virtual box allows you to create a virtual machine inside an OS to run and install other OSs in a safe environment .

This article is divided into two parts : The Lock(where we prepare a virtual machine) and The Load(where we will actually install windows 8 on the virtual machine) .

Before beginning I would recommend you have 4GB of RAM or more and a graphics card with 256mB frame buffer or more . Make sure you have around 20GB of space free in a partition .Download(and install) Virtual Box from the oracle website and an iso image of Windows 8(32 bit or 64bit).Make sure you note down the product key just below the download links in the Microsoft page.

My system specs:

  • Intel Core i5 -750
  • Intel DH55TC
  • 8GB DDR3-1333Mhz RAM
  • AMD Radeon 5770(1GB)
  • Seagate Barracuda 1TB HDD
  • Corsair VX550W

Right on with the guide .

The Lock:

1)  Fire up Virtual Box and click on New .

Step 1

A wizard will pop up and we will follow the instructions .Click on Next.

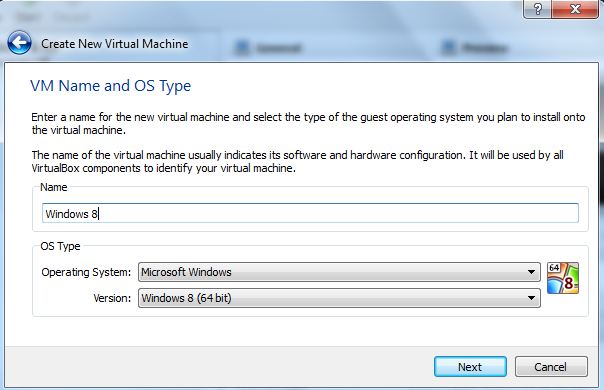
2) Enter a name for your virtual machine and below that select Microsoft as Operating system and if you like me downloaded the 64 bit make sure you select the version as Windows 8(64 bit)

3) Select the amount of RAM that you would want the virtual machine to use(you can change it later if you wish) and click next .I would recommend using 2048mB RAM for a good experience.

4) Probably the most difficult step in this guide 😛 is to prepare a virtual hard disk . Select create a new hard disk and click on next . The create a new virtual hard disk wizard will pop up. Select the file type as VDI(virtualBox Disk Image) . Click next.

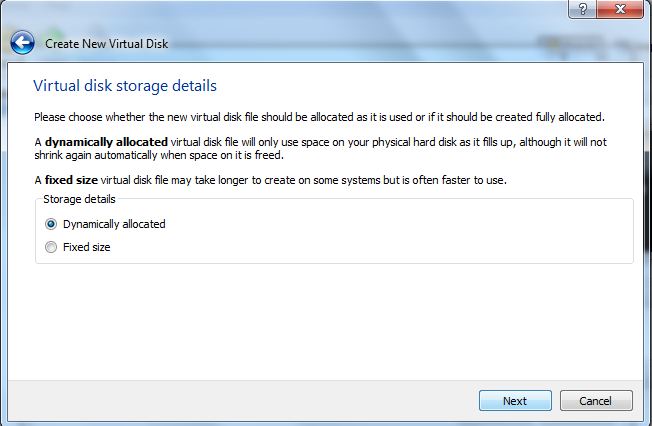
5) Would recommend “fixed size” . 

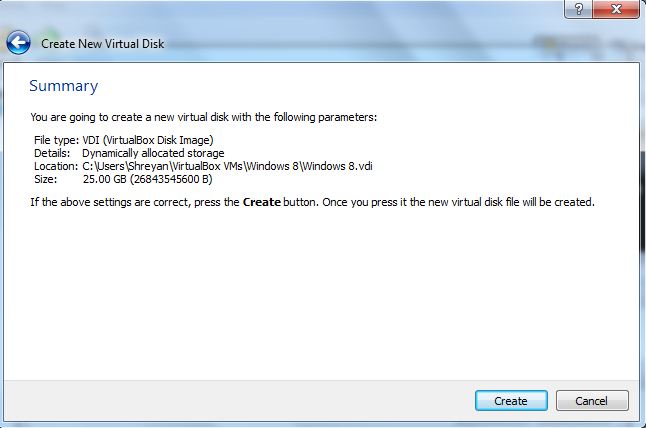
6) In this step you have to give a name for your virtual hard disk as well as decide its size and select the location where you want to create it(to select the location,click on the folder icon next to the text field where you entered the name of you virtual disk).

8) Click on create . Virtual box will create your virtual disk, it took around 5 minutes on my system .

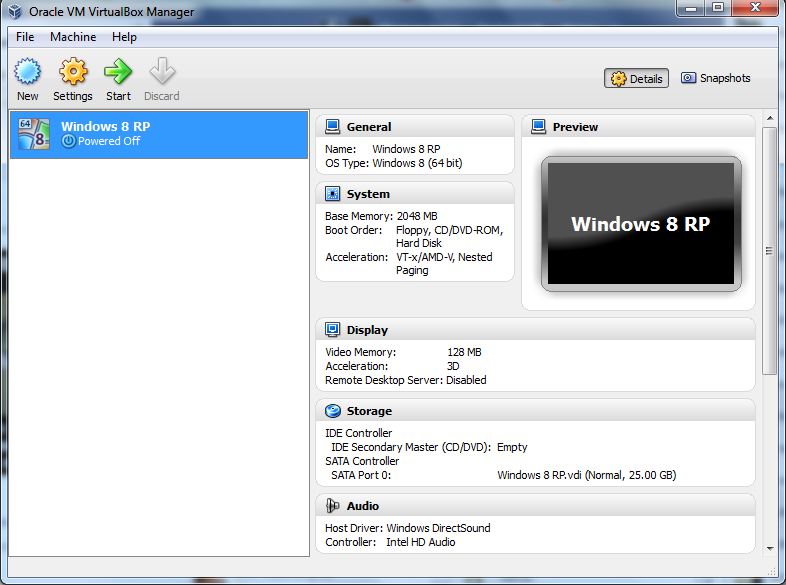
After the disk has been created you will again be taken back to the original screen and you will see your virtual hard disk listed on the left side(see first screenshot) . Now we are ready to install Windows 8 😀 .

The Load

1) Select you virtual hard disk and click on start .

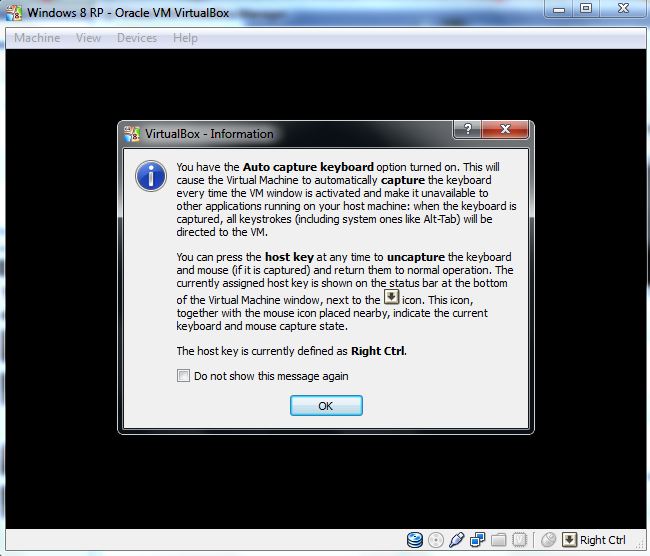
2) A window will pop up telling you that the host key – right control key can be used to capture and focus the cursor and keyboard into your virtual machine.Check the “Do not show this message again” if you well don’t want to see the message again and click OK .

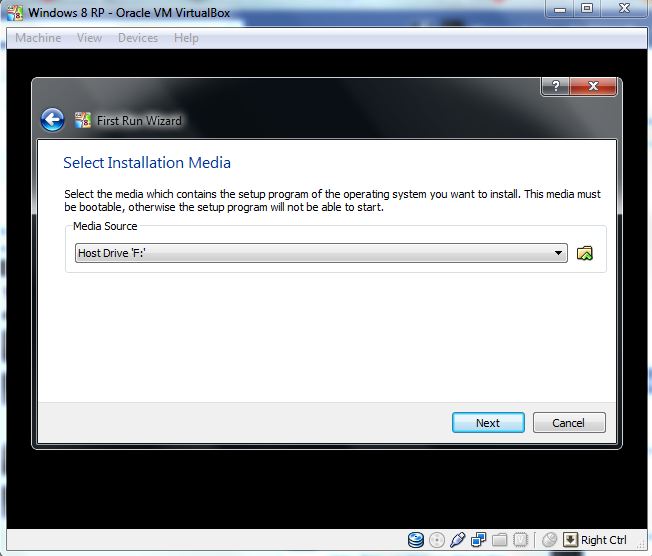
3) A wizard will pop up and will guide us through the installation . Click on Next .

4) In this step you will select your iso . Click on the folder icon and browse to where you have downloaded the iso image . Select the iso and click open . You will see under “media source” the name of the iso will appear . Onward .

5) We will now start the installation of Windows 8 Release Preview .

Select Language to Install as English(United States) or whatever language you want along with the Time and currency format and keyboard input .

6) Enter the product key that you have noted from the Microsoft web page .If you missed it , here is the product key :

TK8TP-9JN6P-7X7WW-RFFTV-B7QPF.

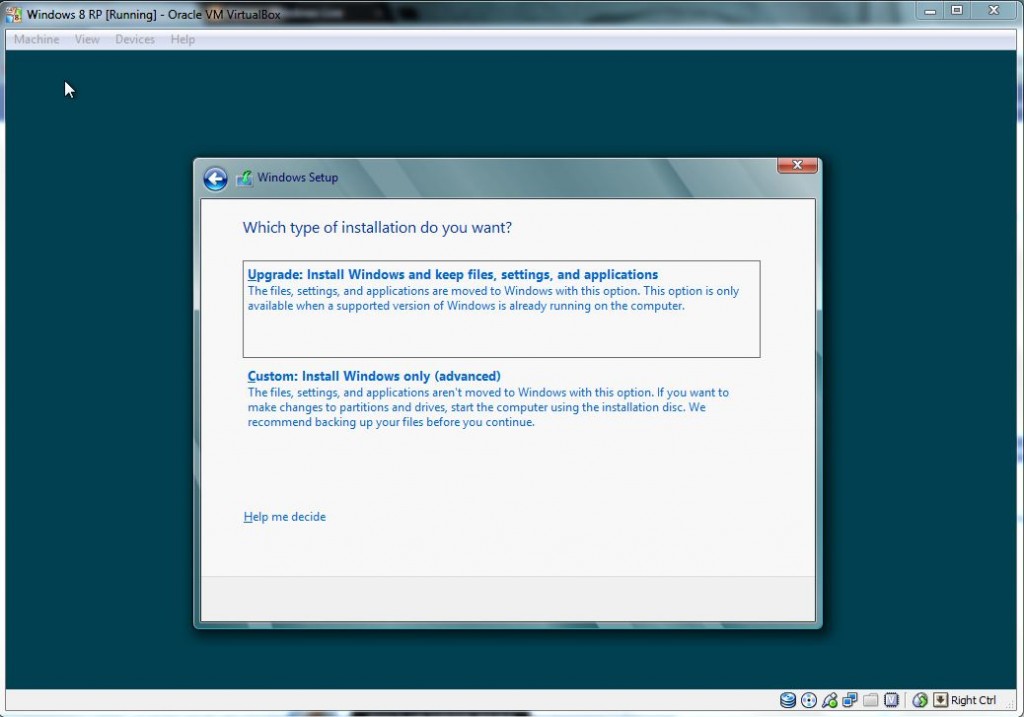
7) Select custom:install windows.

8) You will only see a single disk(which is the virtual hard disk) as you have mounted windows 8 onto your virtual hard disk. We are almost done now . Click next and Windows will begin installing onto your virtual hard disk .Hang in there.

9) When the installation is complete, windows will reboot .

10 )After the reboot you will have to select the colour scheme , some basic settings and log into your windows live account(if you have one) or create one/log into an offline account and enter your phone number . Windows will reboot again and load your settings and get all the devices ready.

And you are good to go with Windows 8 release preview.Hope this helped .

Notes:

  • If you see black bands in Windows 8 along the breadth of your monitor , you will have to install guest additions on your virtual machine . In windows 8 , press the right ctrl key + D and follow the on-screen instructions to install Guest additions .
  • If your machine is very slow , stop the virtual machine . Right click on your virtual machine and select settings .Select System and under system select processor . Now move the processor slider to the number of cores that your processor has.
  • Sorry for the cursor in few of the screenshots .
  • It took me around 12 minutes to install Windows 8 .


Tags: , ,


May 29 2012

Tweet My Post v1.2 Update

Category: WordPressksg91 @ 2:11 pm

I have just released small update for Tweet My Post WordPress plugin. This update allows you to enable debug log. Response from the twitter will be logged, so that you can find out any issue, if any.

More updates will be coming in few days. This updates will bring custom tweet format, user authentication, etc. Stay Tuned.

Visit http://wordpress.org/extend/plugins/tweet-my-post/ to check out the plugin. Suggestions are most welcome. 🙂

What is Tweet My Post?

It is a WordPress plugin allows wordpress users to set their twitter handle and whenever a new post is published, tweet will be sent with post’s title, link and it’s author’s twitter handle. A sample tweet would be “POST_TITLE – POST_LINK by @AUTHOR” . If Author has not set any handle, only POST_TITLE & POST_LINK are tweeted.

Don’t forget to rate the plugin. 🙂

Tags: , , , , ,


Mar 09 2012

3 – Tips To Increase Backlinks and Traffic From Search Engines

Category: SEOksg91 @ 12:32 pm

If you are blogging about current trends or unique topics, search engines play vital role in traffic to your blog. This apply to any kind of sites too. For better rank in search results, backlinks play key role. But how to get thousands of back links? By spamming? No. By buying from those so called backlink building services? Hell NO. Let me share how I created thousands of backlinks by just few work.

To build backlinks, you are not suppose to spam on different sites. There are legal ways you can choose to have backlinks.

#1

First way is to put link to your site/blog in your signature at the forums or discussion boards, you’re using. Almost all forums allow this. So, now link to your site will be displayed at lease as many times as you have posted in forum or discussion board. I used to be very active user at Chip Forums and I had put links to my blogs there. Here is how many links I got to my site from that forum alone:

Do I need to mention how greatly this helped? Well, in just two after adding link to my signature, traffic to my blog increased about 15x times. Usually I used to get 20-30hits from SE daily, and after two days, around 400!

#2

Other way is to engage in discussion on other blogs. Visit and read blogs of your interests, and comment on the blog post (not worthlessly please) and use your blog/site url in Website field of comment form. But don’t put worthless comments else it won’t be approved by author.

#3

You can also make friends with other blog and mutually agree to add links in sidebar. This will create backlinks on all pages of the blog and significantly increase backlinks.


If you have more tips or experiences to share, don’t forget to comment. 🙂

Tags: , , , , ,


Feb 25 2012

How to Track Your WordPress Plugin’s users?

Category: PHP,Programming,WordPressksg91 @ 7:59 pm

Let me clear this straight, this post isn’t about to create WordPress plugin, but how to track your plugin users (blogs).

I have recently published my first plugin on WordPress’ repository at http://wordpress.org/extend/plugins/tweet-my-post/ and I felt really happy to see the downloads. However, what I was missing was, who are using my plugin. I am not sure if tracking the plugin users prohibited or not by WordPress but I am just tracking the url of blogs, that uses my plugin.

Let’s get back to the point – how to track our plugin’s users. This is a simple thing, but main thing is, this should strike your mind. I am posting this for those who haven’t thought (or not able make this happen). Useful also if you’re planning to make one too.

Plugin has a plugin_activation and plugin_deactivation hook, that means, you can register your functions that are executed every time, your plugin is activated and deactivated.

You need to add following code in your plugin file:
As I mentioned earlier, I have added log_operation($op) in the functions that are called while activation and deactivation. $op is operation, either activate or deactivate. Use  appropriate operation in functions. Then whenever plugin is activated or deactivated, log_operation will be called. That function will create a cURL session and post the data of blog url and activation status to the page on our server. Now, what you need to do is to put following code in a page, let’s call it service.php, which is hosted at your server. What it will do is, add the status in our database. You need to put link to this page in above code as a value of $url variable.  
The code is relatively simple to understand so I’m not explaining it at all. Just replace the database name and user details with yours. You will now need the database. Use following table:

Well, you are not ready to see, who are using your plugin. You can look into your database table and enjoy! 😀

If you’re lazy to open PhpMyAdmin and browse the database, simply make a file which fetches the data and display it. 😉

I have not added this in my initial release of plugin, so I can only track the users who are using it after Tweet My Post 1.0. Actually, I should be able to track old users too, because WordPress first deactivate plugin, update it and the reactivate it, so I should have the data of old users who have update the plugin but WordPress doesn’t execute activation and deactivation hook while updating plugin. I’m not sure if this is a bug or intentional, but I can’t know my old users unless they deactivate and reactivate the plugin.

Anyways, if you have any problem or query, please let me know in comments below or ping me  @ksg91 on Twitter. 🙂

Tags: , , , ,


Feb 23 2012

Tweet My Post 1.0 Available

Category: PHP,Programmingksg91 @ 11:11 pm

I have just released an update for Tweet My Post plugin for wordpress. If you are already using it, update it from Plugin menu. You can try plugin by searching for “Tweet My Post” in plugin directory or visit http://wordpress.org/extend/plugins/tweet-my-post/

New version doesn’t have changes to end user but I have updated code internally and added tracking system for me, so that I can analyze plugin usage.

Let me know if you face some problem or issue with this new update. Suggestions are most welcomed.

It’s really nice to see around 400 downloads in just 2 days. Thanks for the support guys. 🙂


Tags: , , , ,


Feb 19 2012

Tweet My Post – A WordPress Plugin

Category: PHP,Programmingksg91 @ 10:16 am

I also run a blog at http://NokiaTips.in and we have many authors there. I always wanted a plugin which auto-tweet our new post to our Twitter account @NokiaTips. There are several WordPress plugin available but I wanted more out of that. I wanted that, that tweet should also contain the twitter handle of Author, so that readers can know that post is authored by whom. I searched WordPress’ Plugin directory but couldn’t find one. So, I thought, better to create one, myself.

I have almost finished the plugin. Find its Git repo at Github – https://github.com/ksg91/Tweet-My-Post

I may have some bug. It’s beta release for now tagged 0.9.

If you have any suggestion, please let me know. You can also contribute to Plugin by forking the repo.

Feel free to try the plugin, after all, it’s free. 😉

Tags: , , , ,


Jan 24 2012

Fackbook Hacker Cup 2012 Qualification Round Solutions [Java] & Explaination

Category: Programmingksg91 @ 6:58 pm

[UPDATE]

I had trashed the post for several days as the solution was shown incorrect in final result and the post was getting high traffic. I didn’t have enough time to fix the post and didn’t wanted to mislead the visitors, so trashing was the easiest option to choose. 😉

For those who don’t know what Facebook Hacker Cup is, it an annual event hosted by Facebook itself which test your skill in Algorithms and problem solving.

Facebook Hacker Cup 2012 Qualification Round ended some hours ago and now I can post my solutions here and that won’t be cheating. 😉 Final scoreboard is still not updated but I believe my solutions are correct, at least for example input/output, they worked correctly & efficiently.

Last year, I successfully solved all three problems of Qualification round ( 2 medium level and 1 hard) and 2 problems of Round 1 (hard level but didn’t work efficiently in time limit for  their huge constraints). Sadly, this year, I could solve only two problems out of three. I failed to solve Auction problem. Don’t know whom to blame, my skill, lack of interest (as only 1 problem needs to be solved to qualify) or my laziness. I solved Billboard and Alphabet Soup problems. Solutions are in java.

Billboards 

We are starting preparations for Hacker Cup 2013 really early. Our first step is to prepare billboards to advertise the contest. We have text for hundreds of billboards, but we need your help to design them.

The billboards are of different sizes, but are all rectangular. The billboard widths and heights are all integers. We will supply you with the size in inches and the text we want printed. We want you to tell us how large we can print the text, such that it fits on the billboard without splitting any words across lines. Since this is to attract hackers like yourself, we will use a monospace font, meaning that all characters are of the same width (e.g.. ‘l’ and ‘m’ take up the same horizontal space, as do space characters). The characters in our font are of equal width and height, and there will be no additional spacing between adjacent characters or adjacent rows. If you print a word on one line and print the next word on the next line, you do not need to print a space between them.

Let’s say we want to print the text “Facebook Hacker Cup 2013″ on a 350×100″ billboard. If we use a font size of 33” per character, then we can print “Facebook” on the first line, “Hacker Cup” on the second and “2013” on the third. The widest of the three lines is “Hacker Cup”, which is 330″ wide. There are three lines, so the total height is 99″. We cannot go any larger.

Input

The first line of the input file contains a single integer T: the number of test cases. T lines follow, each representing a single test case in the form “W H S”. W and H are the width and height in inches of the available space. S is the text to be written.

Output

Output T lines, one for each test case. For each case, output “Case #t: s”, where t is the test case number (starting from 1) and s is the maximum font size, in inches per character, we can use. The size must be an integral number of inches. If the text does not fit when printed at a size of 1″, then output 0.

Constraints

  • 1 <=T <= 20
  • 1 <=W, H <= 1000
  • The text will contain only lower-case letters a-z, upper-case letters A-Z, digits 0-9 and the space character
  • The text will not start or end with the space character, and will never contain two adjacent space characters
  • The text in each case contains at most 1000 characters
Example input
5
20 6 hacker cup
100 20 hacker cup 2013
10 20 MUST BE ABLE TO HACK
55 25 Can you hack
100 20 Hack your way to the cup

Example output
Case #1: 3
Case #2: 10
Case #3: 2
Case #4: 8
Case #5: 7

UPDATE: While my solution seemed correct conceptually and even for the example input, it yielded correct  output, final scoreboard said, my output was incorrect. I have not try to find the correct solution due to lack of time but if you guys can figure out my mistake, please feel free to comment. 🙂

 The problem seems simple for some but it wasn’t that simple because you are not suppose to split a word. After thinking enough, I came to the solution that we should solve it by increasing font size linearly and wrapping text in billboard. Here wrapping was main thing, I mean, if  total width exceed available space, just put last word in new row and follow these steps until new rows are available. And when total height of rows exceed the available height, you have your maximum size available.
I had implemented it much earlier but wasn’t getting correct answers and after a day, I realized, algorithm was correct but I was passing parameters in wrong sequence, i.e. passing height and width as width and height while function call! 😛
Lets have a look at implementation of  this algorithm in Java:
[sourcecode language=”java”]
/*
* To change this template, choose Tools | Templates
* and open the template in the editor.
*/
package hackercup;

/**
*
* @author kishan
*/
import java.io.*;
public class BillBoard1 {
int h,w;
String s;
int rows=1;
int maxSize=1;
String rowText[]=new String[1000];
public BillBoard1(int w,int h, String s)
{
this.h=h;
this.w=w;
this.s=new String(s);
rowText[0]=new String(s);
}
int getMaxSize()
{
while(true)
{

//System.out.println(maxSize);
boolean b=wrapText();
if(b)
return maxSize-1;
if(rows*maxSize&amp;gt;h)
break;
maxSize++;
}
return (maxSize-1);
}
boolean wrapText()
{
for(int i=0;iw)
{
int lastIndex=rowText[i].lastIndexOf(&amp;quot; &amp;quot;);
if(lastIndex==-1)
return true;
if(i==rows-1)
{
rowText[i+1]=new String(rowText[i].substring(lastIndex+1)).trim();
rows++;
}
else
{
//System.out.println(&amp;quot;kjsdfl&amp;quot;);
rowText[i+1]=new String(rowText[i].substring(lastIndex+1)+&amp;quot; &amp;quot;+rowText[i+1]).trim();
}
rowText[i]=rowText[i].substring(0,lastIndex).trim();

}
//System.out.println(rowText[i]);
}
//System.out.println(rows+&amp;quot; &amp;quot;+maxSize);
return false;

}
public static void main(String[] args) throws IOException
{
//int r;
FileInputStream fl=new FileInputStream(&amp;quot;D:input1.txt&amp;quot;);
DataInputStream dis=new DataInputStream(fl);
int t=Integer.parseInt(dis.readLine());
for(int i=1;i {
//String[] s=dis.readLine().split(&amp;quot; &amp;quot;);
String os=dis.readLine();
String[] s=os.split(&amp;quot; &amp;quot;);
String str[]=os.split(&amp;quot;[0-9]+ [0-9]+&amp;quot;);
//System.out.println(str[1].trim());
BillBoard1 obj=new BillBoard1(Integer.parseInt(s[0]),Integer.parseInt(s[1]),str[1].trim());
System.out.println(&amp;quot;Case #&amp;quot;+i+&amp;quot;: &amp;quot;+obj.getMaxSize());
}
}
}
[/sourcecode]


I consider this to be efficient because considering the constraints, this implementation gave output in less than a second.

Alphabet Soup

Alfredo Spaghetti really likes soup, especially when it contains alphabet pasta. Every day he constructs a sentence from letters, places the letters into a bowl of broth and enjoys delicious alphabet soup.

Today, after constructing the sentence, Alfredo remembered that the Facebook Hacker Cup starts today! Thus, he decided to construct the phrase “HACKERCUP”. As he already added the letters to the broth, he is stuck with the letters he originally selected. Help Alfredo determine how many times he can place the word “HACKERCUP” side-by-side using the letters in his soup.
Input

The first line of the input file contains a single integer T: the number of test cases. T lines follow, each representing a single test case with a sequence of upper-case letters and spaces: the original sentence Alfredo constructed.
Output

Output T lines, one for each test case. For each case, output “Case #t: n”, where t is the test case number (starting from 1) and n is the number of times the word “HACKERCUP” can be placed side-by-side using the letters from the sentence.
Constraints

1 < T ? 20
Sentences contain only the upper-case letters A-Z and the space character
Each sentence contains at least one letter, and contains at most 1000 characters, including spaces

Example input

5
WELCOME TO FACEBOOK HACKERCUP
CUP WITH LABEL HACKERCUP BELONGS TO HACKER
QUICK CUTE BROWN FOX JUMPS OVER THE LAZY DOG
MOVE FAST BE BOLD
HACK THE HACKERCUP

Example output

Case #1: 1
Case #2: 2
Case #3: 1
Case #4: 0
Case #5: 1

This problem is quite simple. You are suppose to count the frequency of character, we require to form hackercup. Each time you create hackercup, you need h, a, 2x c, k, e, r, u, p. Simple implementation of this problem  in java is here:

[sourcecode language=”java”]&amp;lt;/pre&amp;gt;
/*
* To change this template, choose Tools | Templates
* and open the template in the editor.
*/

package hackercup2;
import java.io.*;
/**
*
* @author kishan
*/
public class Alphabet {
void calculateAlphaFor(String s,int tc)
{
int h=0,a=0,c=0,k=0,e=0,r=0,u=0,p=0;
int count=0;
for(int i=0;i {
switch(s.charAt(i))
{
case ‘H’:
h++;
break;
case ‘A’:
a++;
break;
case ‘C’:
c++;
break;
case ‘K’:
k++;
break;
case ‘E’:
e++;
break;
case ‘R’:
r++;
break;
case ‘U’:
u++;
break;
case ‘P’:
p++;
break;
default:
break;
}
}
while(true)
{
if(c<=1 || h==0 || a==0 || k==0 || e==0 ||r==0 || u==0 ||p==0 )
break;
c–;
h–;
a–;
c–;
k–;
e–;
r–;
u–;
p–;
count++;
}
System.out.println(&amp;quot;Case #&amp;quot;+tc+&amp;quot;: &amp;quot;+count);
}
public static void main(String[] a) throws IOException
{
FileInputStream fl=new FileInputStream(&amp;quot;D:input.txt&amp;quot;);
DataInputStream dis=new DataInputStream(fl);
Alphabet obj=new Alphabet();
int t=Integer.parseInt(dis.readLine());
for(int i=1;i {
obj.calculateAlphaFor(dis.readLine(),i);
}
}
}

[/sourcecode]

I don’t think more explanation for this solution is needed. It’s quite simple and straight forward.

Tags: , , , , , , , , ,


« Previous PageNext Page »